The day after I published an abbreviated list for upgrading to 12.2.0.1, my partner and I were upgrading two QA Databases which happened to be 2 node RAC.

As DBUA was doing its final restart, it spit out this error stack…

Error ignored: PRCR-1013 : Failed to start resource ora.*****.dbPRCR-1064 : Failed to start resource ora.q*****.db on node xdt**dbadm02CRS-5017:
The resource action “ora.q*****.db start” encountered the following error: ORA-00443: background process “IPC0” did not start.
For details refer to “(:CLSN00107:)” in “/u01/app/grid/diag/crs/xdt**dbadm02/crs/trace/crsd_oraagent_oracle.trc”.CRS-2674: Start of ‘ora.q****.db’
on ‘xdt**dbadm02’ failedCould not complete the RAC specific configuration changes.

As any good DBA would do, I Googled ORA-00443: background process “IPCO” did not start. I got nothing. Not a single suggestion. My partner had an open SR with Oracle on this same issue but it has been open for 30+ days. This was my first experience with this where I wasn’t able to start one of the nodes. Previously, I removed the srvctl entry, re-created it, and restarted the database with success. No such luck this time.

As it turns out, there are a few documents including a bug id for this issue.

1) Exadata: Connect After Upgrade Returns ORA-600 [ipc_create_que_1], [2], [8] ( Doc ID 2134464.1 )
2) ORA-00600 [ipc_create_que_1] on Instance Startup ( Doc ID 2110743.1 )

3) Bug 25498930 – Startup fails due to IPC0 process getting ORA-600 [ipc_create_que_1] with underlying rdma_bind_addr failed – OS errno 98 ( Doc ID 25498930.8 )

Rather than update the pfile, we did this:

On the node that opens,

SQL> alter system set “_ksxp_xrc_cm_port”=1026 scope=both sid=’*’;

From srvctl start the node that didn’t start the first time.

srvctl start database -d db_name

That did it. Note that support recommends using a port between 1026 and 2048. Be creative! Choose your port with style!

Since I have had trouble with Oracle Support in the past, it’s nice to see something work in our favor!

Thanks for reading! Also check out my new blog at <free-indeed.blog>! I talk about my past (not so great) experience in a really bad church.

Regards,

Jason
Good morning, Oracle Database Experts, rookies, and everyone in between. I have now done a couple dozen upgrades and have encountered a few bumps and bruises. It is now time for me to create an abbreviated list of steps unique to Oracle RAC on Exadata. It is not fully comprehensive and neither is the DOC ID I have been using. My document plus the Doc ID and your own round of testing should do the trick.

I am assuming you are aware of the requirements and prerequisites for upgrading. One of those that we have run into is the requirement to be on 12.2 Grid, 12.2 Exadata and 12.2 Storage. I am also assuming you have created a new Oracle home and uploaded the 12.2 Software.

  • Pre-Upgrade
    • Check for Invalid Objects:
    • SQL> @$ORACLE_HOME/rdbms/admin/utlrp.sql
    • Check Registry for Invalid Packages:
      1. Remove any Invalid Packages. The necessary 12C Packages will be recreated during the DBUA Upgrade.
      2. SQL> select comp_id, comp_name, version, status from dba_registry;
      3. **EX** @drop_spatial.sql
    • Gather Optimizer Statistics and Fixed Object Stats.
    • SQL> EXEC DBMS_STATS.GATHER_DICTIONARY_STATS;                     SQL> EXEC DBMS_STATS.GATHER_FIXED_OBJECTS_STATS;
    • Verify Materialized View Refreshes are Complete before Upgrade.
    • SQL> SELECT o.name FROM sys.obj$ o, sys.user$ u, sys.sum$ s WHERE o.type# = 42 AND bitand(s.mflags, 8) =8;
      • For our environment, the few databases that utilized MVIEWS have frequent refresh jobs running. So we turned off the CRON prior to upgrade and turned them back on after the upgrade.
    • Purge DBA Recycle bin.
    • SQL> PURGE DBA_RECYCLEBIN;
    • Copy Encryption Wallets to 12.2 Oracle Home. Copy to all nodes in RAC. **Missing this step or performing this step incorrectly will either cause the upgrade to fail or will cause problems with future connections to the database.
    • cp cwallet.sso /u01/app/oracle/product/12.2.0.1/dbhome_1/admin/recover_db/wallet                                                    cp ewallet.p12 /u01/app/oracle/product/12.2.0.1/dbhome_1/admin/recover_db/wallet
    • Drop the audit_admin user and role. (self explanatory)
    • Ensure your SGA is set to at least 3GB. We set ours to a minimum of 5GB.
    • Take a full backup of the database.
    • Check your accounts for Case-Insensitive Password Version (10g or below)

Log in to SQL*Plus as an administrative user, and enter the following SQL query
SELECT USERNAME,PASSWORD_VERSIONS FROM DBA_USERS;

If there are any 10g versions, suggest you to refer Oracle documentation to fix 10g versions, failing to do so, user accounts with LOCKED after upgrade is completed. We updated our sqlnet.ora file to allow earlier password versions for legacy systems.


  • Upgrade with DBUA. Don’t forget to set your DISPLAY Variable.
    • Invoke DBUA with the X-Server of your choice: I borrowed the image from the MOS Document. Check for syntax in your own environment.
  • $ export DISPLAY=10.212.72.49:0.0
    $ export ORACLE_HOME=/u01/app/oracle/product/12.2.0.1/dbhome_1
    $ export PATH=$ORACLE_HOME/bin:$PATH
  • $ dbua &
    
    
    • Select a database for upgrade. This version lists single instance and RAC DB’s together.
    • Pre-Requisite Checks. If there are no errors, click next. If you have done a good job with the pre-upgrade steps, the warnings can be noted and you can move on. If you missed a step, it will show up as an error. You will need to fix this before proceeding.
    • Select Upgrade Options: I chose Enable Parallel Upgrade, Upgrade Timezone Data only. We already gathered stats and recompiled invalid objects. I will do so again manually after the upgrade. I invite you to choose which options. I have found that doing as much as I can manually will speed up the DBUA process and make less room for failure.
    • Select Recovery Options:
      • I always take a full backup in my pre-steps.
      • I let DBUA set a Flashback and Guaranteed Restore Point. This is way faster than trying to restore a database from a Full Backup.
    • Un-Check the Enterprise Management Configuration.
    • Study the Database Upgrade Summary and click Finish.
    • Tail the logs. I tail the oracle_server log, the alert log and the parallel log that is running all the sql steps.
  • Post-Upgrade Steps:
    • Verify /etc/oratab is set correctly. DBUA doesn’t do that correctly for RAC Databases in my experience.
    • Verify tnsnames.ora is updated in the 12.2 Oracle Home.
    • Verify the registry. Same as pre-step.
    • Run utlrp to validate invalid objects. Same as pre-step.
    • Don’t forget to drop your Restore Point and turn off Flashback. You may get a surprise when you run out of recovery space!
    • Run the post upgrade fixup script on the upgraded database.

What challenges have you encountered and overcome? I’d love to hear your stories.

Source: Historical SQL Monitor reports in 12c!

During a database upgrade, the upgrade failed on Phase 104, APEX Upgrade. My solution was to remove the APEX Package prior to upgrade since DBUA will install APEX by default if it isn’t already installed. Thanks for the tip!

Matthias Hoys

Environment: Oracle Linux 6.2, Oracle database 11gR2 11.2.0.3, APEX 3.2.1

If you use the graphical dbca utility to create a new Oracle 11gR2 database, you will have noticed that this includes Application Express by default, and there is no way to deselect that option (to my knowledge) during the installation process. Here I will explain how you can remove APEX from the 11g database after the installation.

First, you need to figure out what version of APEX is installed. You can do this by looking at the name of the APEX_xxxxxx schema, or by executing the following query (with user SYS as SYSDBA):

SQL> select version from dba_registry where comp_id=’APEX’;

VERSION
——————————————————————————–
3.2.1.00.12

Next, you need to download the exact same version of the software (in this case: version 3.2.1) from Oracle’s website. The last version of APEX as of writing is 4.1.1, but the uninstallation won’t work with…

View original post 147 more words

Good afternoon, Oracle Pioneers!

A few months ago (maybe a year ago), I published an article on how to convert a single instance database into a RAC database.  Converting a Single Instance To RAC DB However, that article assumed this was already a RAC database at some prior to its migration and subsequent (RACifying) **Yes RACifying is a word I made up or stole from someone**

If this database is and has always been a single instance, there are likely a few missing parameters that are needed in order to make it into a multiple instance database.

So here is my updated version of how to convert a single instance database into a RAC Database using command line and srvctl. These steps will work for 11g or 12c databases.

After single instance is available do this:
If this is a single instance you are migrating and “racifying”, you must create undotbs2 and logfiles for thread 2 to match number and size of thread 1.

  1. SQL> create undo tablespace undotbs2 datafile ‘+DATA’ size 4G;
  2. SQL> alter database add logfile thread 2 group 5 size 4096M;   
  3. SQL> alter database enable public thread 2; 
  4. Verify these parameters are set in your pfile:

control_files **Update location info from +data and +reco Location         

db_name1.thread=1                                                                                                                                 db_name2.thread=2                                                                                                           db_name1.undo_tablespace=’UNDOTBS1′                                                                 db_name2.undo_tablespace=’UNDOTBS2′                                                                   db_name1.local_listener='(ADDRESS=(PROTOCOL=TCP)(HOST=xdt*client01-vip)(PORT=9653))’ db_name2.local_listener='(ADDRESS=(PROTOCOL=TCP)(HOST=xdt*client02-vip)(PORT=9653))’ db_name1.instance_number=1 db_name2.instance_number=2 *.remote_listener=’xdt*-scan:9653’5.

5. edit $ORACLE_HOME/dbs/init<db_name>.ora to a one line file reading location of new spfile:

spfile=’$ORACLE_HOME/dbs/init<db_name>.ora’
6. copy file to $ORACLE_HOME/dbs/init<db_name><inst#>.ora on all nodes

7.   shutdown immediate;

8. Create srvctl setup. See my previous article on converting a single instance to a RAC DB.

9. Log into instance and set cluster database to true:

srvctl start instance -d db_name -i db_name1

SQL> alter system set cluster_database=true scope=spfile sid=’*’;

10. Shutdown and restart database with srvctl:

srvctl stop database -d db_name -o immediate -f

srvctl start database -d db_name

Good luck and let me know if you have any issues! Keep on RACifying out there!

Good morning, RAC and Dataguard Enthusiasts!!

I have already posted how to convert a single instance into a RAC Database. This post will focus on the subtle differences of doing this on a Dataguard Standby. When I have used Dataguard to migrate a RAC database to a new server, I created my Standby as a single instance. To make a viable Switchover, this Standby must now be converted to a RAC Standby. I must warn you up front, these are the steps I took in my 2 node RAC Exadata Server. The steps unique to a standby are in bold font. Test this in your own sandbox before you proclaim this as gospel truth.

The setup pieces can either all be done at the beginning or the end. They are ordered as I performed them so feel free to test and experiment. Some of these steps are assumed but I listed them anyways.

  • Copy/create your password file, wallet, and adump directory from the source database to both nodes. The steps work the same, regardless of the number of nodes.
  • Create oratab entry on both nodes. vi /etc/oratab
  • Add tnsnames entries on both nodes and static listener entry on Standby Node.
    • DB1 =
      (DESCRIPTION =
      (ADDRESS = (PROTOCOL = TCP)(HOST = xdt**client01-vip)(PORT = ****))
      (CONNECT_DATA =
      (SERVER = DEDICATED)
      (SID = db1)
      )
      )
    • DB2 =
      (DESCRIPTION =
      (ADDRESS = (PROTOCOL = TCP)(HOST = xdt**client02-vip)(PORT = ****))
      (CONNECT_DATA =
      (SERVER = DEDICATED)
      (SID = db2)
      )
      )
  • Shutdown Managed Apply on Dataguard Instance
    • Ensure all standby logs are applied and caught up
    • SQL> select * from v$recovery_progress; **There is a better way to check this but I don’t want to publish someone else’s work as my own. **
    • SQL> ALTER DATABASE RECOVER MANAGED STANDBY DATABASE CANCEL; 
  • Shutdown the single instance database.
    • SQL> shutdown immediate;
    • SQL> exit
  • Set environment to node 1.
    • $ . oraenv
    • ORACLE_SID = [db] ? db1
  • Edit original pfile to make it a cluster database. Remove [*.interconnects] lines to prevent an attempt to connect to the source database.
    • *.cluster_database=true
  • Startup nomount with your original pfile.
    • SQL> startup nomount pfile=’$ORACLE_HOME/dbs/inintdb.ora’
  • Create spfile from pfile. This creates a one line, pointer file in the /dbs directory.
    • SQL> create spfile=’+DATA_XDT**/DB/PARAMETERFILE/spfiledb.ora’ from pfile=’$ORACLE_HOME/dbs/inintdb.ora’;
  • Shutdown database.

Create srvctl setup
etlpc used as concrete example:
——————————-
# ETLPC
##
srvctl remove database -d ETLPCDG
srvctl add database -d ETLPCDG -c RAC \
-o /u01/app/oracle/product/11.2.0.4/dbhome_1 \
-m int.carlsonwagonlit.com \
-p +DATA_XDT*/ETLPC/PARAMETERFILE/spfileETLPCDG.ora \
-s OPEN -t IMMEDIATE -n ETLPCDG

srvctl add instance -d ETLPCdg -i ETLPCdg1 -n xdt*dbadm01
srvctl add instance -d ETLPCdg -i ETLPCdg2 -n xdt*dbadm02
–srvctl add instance -d etlpc -i etlpc3 -n xdt*dbadm03
–srvctl add instance -d etlpc -i etlpc4 -n xdt*dbadm04

srvctl enable instance -d ETLPCdg -i “ETLPCdg1,ETLPCdg2”
–srvctl disable instance -d etlpc -i “etlpc1,etlpc2,etlpc3,etlpc4”

srvctl config database -d ETLPCdg
srvctl status database -d ETLPCdg

  • Startup instance 1 in mount. This will startup mount with the spfile on ASM.
    • $ srvctl start instance -d etlpcdg -i etlpcdg1 -o mount
  • Startup Managed Apply on Node 1
    • SQL> ALTER DATABASE RECOVER MANAGED STANDBY DATABASE USING CURRENT LOGFILE DISCONNECT;
  • Once MRP0 process is running standby logs are applied, startup node 2 in mount mode:
    • $ srvctl start instance -d etlpcdg -i etlpcdg2 -o mount

I hope this clears up the differences between converting a normal database to RAC verses converting a standby database to RAC. Please let me know if you have any questions or comments.

Thanks for reading!

Jason

Good afternoon, Oracle Miracle Workers! It’s database migration time, in preparation for upgrades to 12.1.0.2 or maybe 12.2 on premise. No, I’m not ready to go to the cloud. Sorry, Oracle, hold your horses. So here’s how we are doing it.

  1. Prepare the Primary Database:

  • Open a sql plus session and enable FORCE LOGGING Mode:
SQL> select force_logging from v$database;
NO
SQL> alter database force logging:
  • Create Standby Redo Logs: Note: When you clone the database for standby, these redo logs will automatically be created on the standby database.
SQL> ALTER DATABASE ADD STANDBY LOGFILE ‘+RECO’ size 50M; --these should match the size of your online redo logs. I created one more than the number of my online redo logs (5).
  • Set the LOG_ARCHIVE_DEST_1 init Parameter to use the FRA as the first archive log location:
SQL> alter system set log_archive_dest_1='LOCATION=USE_DB_RECOVERY_FILE_DEST';
  • Set the LOG_ARCHIVE_CONFIG and LOG_ARCHIE_DEST_2 init parameters on the primary db:
SQL> alter system set log_archive_config = 'dg_config=(PRIMARY_db,STANDBY_db)';

SQL> alter system set log_archive_dest_2 ='SERVICE=STANDBY_DB  NOAFFIRM ASYNC VALID_FOR=(ONLINE_LOGFILES,PRIMARY_ROLE) DB_UNIQUE_NAME= STANDBY_DB ';
  • Turn on ARCHIVELOGMODE if needed. Requires a shutdown.
 SQL> select log_mode from v$database;

ARCHIVELOG

  1. Set up the tnsnames and listener entries. 

This, to me, is always the trickiest step. In my test case, I am creating a single instance standby from a 2 Node RAC Primary Database. I will make it a RAC at the end. A static listener entry is required on the standby server to accommodate the clone.

SID_LIST_LISTENER =
  (SID_LIST =
    (SID_DESC =
      (GLOBAL_NAME=standby_db)
      (ORACLE_HOME=/u01/app/oracle/product/11.2.0.4/dbhome_1)
      (SID_NAME=standby_db)
     )
  1. Make a pfile from the primary database and copy it to the standby server:

SQL> create pfile='/u01/app/oracle/product/11.2.0.4/dbhome_1/dbs/initstandby_db.ora' from spfile;

Prepare it as if you were doing a clone but reverse the LOG_ARCHIVE_CONFIG and the LOG_ARCHIVE_DEST_2 settings. Ensure the db_unique name is = to the standby database name and ensure the db_name is the same as the primary db_name.

  1. Prepare the Standby Database:

    • Copy the password file and wallet entries from the primary to the standby server
    • Create an entry in /etc/oratab using the db_unique_name (standby_db).
  2. Set your environment to standby database and startup nomount using your new pfile.

SQL> startup nomount pfile =’ /u01/app/oracle/product/11.2.0.4/dbhome_1/dbs/initstdbydb.ora’;
SQL> exit
  1. RMAN Steps. 

I utilized Commvault for the Backup and duplicate steps. Takes the fun out of it but it I highly recommend it if it is at your disposal.

  • Take a full backup and use the backup to do a duplicate to standby:
run {
backup database plus archivelog;
backup current controlfile for standby;  
}
  • Optionally, run it again archivelog only.
run {
sql "Alter System Archive Log Current";
Backup ArchiveLog all ;
Backup current controlfile for standby;
}
  • Copy those files to a shared file system or a file system with the same structure.
  • Run the Duplicate to Standby:
connect target sys/pw@<primarydb>
connect auxiliary/pw@<standby> 
run {
set until sequence <seqno> thread <thrdno>
duplicate target database for standby
dorecover ;
     }
  1. Verify your standby is set up and applying logs.

    • Log in to the standby and query v$database;
  SQL> select db_unique_name ,primary_db_unique_name,database_role,switchover_status,open_mode,log_mode,force_logging from v$database;
  1. Perform a log switch on the primary database:

SQL> alter system switch logfile;

  1. Query standby to see if archived logs are being applied.

SQL> select sequence# ,first_time, next_time, applied from v$archived_log order by 1;

My first two attempts failed due to incorrect tnsnames settings. Once I got that settled, it worked famously. In the near future, I will post about setting up a Snapshot Standby and converting the DB to RAC.


Good afternoon, Oracle Database Security Professionals!

I was tasked to investigate a Schema that had direct access to some tables it had no business having. I was told to remove this direct access. Should be a quick easy task, right?

  1. I looked at the user’s permissions with SQL Plus. The user had no direct access to any of the tables I was told it had access to.
  2. I created a user with the create like function in SQL Developer DBA View.
  3. I logged into my new user and ran the following query:SQL> select * from all_tables where owner in (‘Schema_1′,’Schema_2’);Wow! My new user had access to all the tables my customer told me it had access to. I thought about public synonyms but that would still require access to the table. I even tried to revoke access to one of the tables. Got something along the lines of “Can’t revoke a privilege that is not granted by Grantee”. I am a SYSDBA. How can I not revoke?
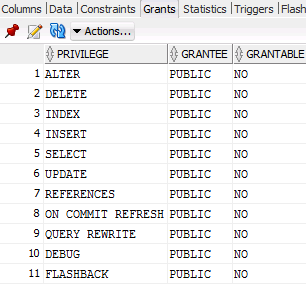
  4. Next, I looked at Grants on the individual table…

grants_on_tables

What’s this? Who is PUBLIC? Well, PUBLIC seemed to be granting access to this table to any Schema or User that can connect to the database. I was quite correct in my assumption. After confirming with the customer, what I did next was to revoke these table privileges as SYSDBA.

SQL> revoke all on “SCHEMA”.”TABLE_NAME” from “PUBLIC”;

The statement below also works but would require 11 steps instead of one.

SQL> revoke SELECT on “SCHEMA”.”TABLE_NAME” from “PUBLIC”;

Finally, I went back to my created user to confirm:

SQL> select * from all_tables where owner in (‘ODS’,’DOC’);

no rows selected

Now that is what I expected. I never knew there was a way to grant public use of objects in Oracle. Now I know. This may be news to some of you as I seem to be constantly learning what I don’t know about Oracle. The bottom line is, be careful of what you grant to PUBLIC.

Thanks for reading!

Jason

Great post by Adityanath’s Oracle Blog! This helped me tremendously as well! I was getting Archiver Hung Error because my archivelog backups had been failing to delete archivelogs for over 60 days. Thanks!

Adityanath's Oracle Blog

We got issue in one of the production environment, RMAN archivelog backup was failing with following errors:


kgefec: fatal error 0 
kgepop: no error frame to pop to for error 603

We were using following command in rcv file to backup archivelogs:


BACKUP archivelog all delete input;

After searching on metalink, I found one note with same scenario : RMAN Archivelog backup with DELETE INPUT fails kgepop: no error frame to pop to for error 603 (Doc ID 1921228.1)

According to this note, RMAN errors out when over 5000 archivelogs were being backed up resulting in an excessively large pl/sql to be executed.

Yes in my case, RMAN was processing more than 2TB archives in one go.


SELECT NAME,ROUND(SPACE_LIMIT / 1048576) SPACE_LIMIT_MB,ROUND(SPACE_USED / 1048576) SPACE_USED_MB,ROUND(((SPACE_USED / 1048576) * 100) / (SPACE_LIMIT / 1048576), 2) PRC_USED FROM V$RECOVERY_FILE_DEST;
NAME SPACE_LIMIT_MB SPACE_USED_MB PRC_USED
------------------------------ -------------- ------------- ----------
+RECO_FIN 3145728 2085370 66.29

As…

View original post 51 more words

Good afternoon, Oracle Database Enthusiasts! Nothing gets me in the holiday spirit like quarterly patching… Not!! When it comes to Oracle Patching, it will fail for just about any reason it feels like. Here’s another fun one. If you haven’t experienced it yet, read on…

Still here? So…

Two Fridays ago, when patching Grid on Node 1, the patch apply hung for about an hour and then quit. The log sat there quiet for the entire hour. Once the patch finally failed, it spit out all of the errors it was experiencing.

Root cause was this…

Unable to lock Central Inventory.  OPatch will attempt to re-lock.Do you want to proceed? [y|n]

Y (auto-answered by -silent)

User Responded with: Y

OPatch will sleep for few seconds, before re-trying to get the lock…

OUI-10022:The target area /u01/app/oraInventory cannot be used because it is in an invalid state.

OPatchSession cannot load inventory for the given Oracle Home /u01/app/11.2.0.4/grid. Possible causes are:

No read or write permission to ORACLE_HOME/.patch_storage

Central Inventory is locked by another OUI instance

No read permission to Central Inventory

The lock file exists in ORACLE_HOME/.patch_storage

The Oracle Home does not exist in Central Inventory


Had the log actually spit out the warning during the patch attempt, I might have been able to fix it on the fly. No such luck. Instead it spit 100 copies of the above error AFTER the patch failed. LOVELY. I ran out of time and had to rollback. 

When there is a lock in /u01/app/oraInventory, it creates a locks directory and a file underneath it like /u01/app/oraInventory/locks/inventory.lock. The solution was to remove the file and the locks directory. I tested this by creating this directory and file manually in our sandbox. I Love Oracle Sandboxes!! If you don’t have one, you really should get one! As I attempted to patch grid on node 1 of our sandbox, it created the exact same scenario. It shut down CRS and just hung for an hour, trying over and over again to create a lock on oraInventory. Once it errored out, I removed the directory and file. Patching of Grid took then less than ten minutes. I am now adding this step to my prerequisites:

Check the /u01/app/oraInventory/locks directory and subsequent files.  If they exist, remove them.

I hope this helps those of you who have not yet applied October’s CPU. Or, if anything, it applies a little comic relief for all you sick techies like me who laugh at other’s misfortunes.

Thanks for reading!

Jason

Update!! I attempted the patch again tonight, armed with my former findings. I patched the Grid Home and Oracle Home and seven Catbundle scripts in less than 2 hours!! Much better this time around!!